How to Install and Use Hyper-V on Snapdragon X Elite Laptops
Using Hyper-V on Snapdragon X Elite laptops is not so easy but this guide will help
![]() 5 min. read
5 min. read
![]() Published on
Published on
Share this article

Improve this guide
Read our disclosure page to find out how can you help Windows Report sustain the editorial team Read more
Setting up Hyper-V on Snapdragon X Elite laptops can significantly enhance your virtualization capabilities, especially if you’re looking to run ARM64 Linux distributions. Let’s dive into the steps to get Hyper-V up and running, troubleshoot common issues, and explore integrating Windows Subsystem for Linux (WSL) with Hyper-V.
How do I use Hyper-V on Snapdragon laptops?
1. Installing Hyper-V on Snapdragon X Elite laptops
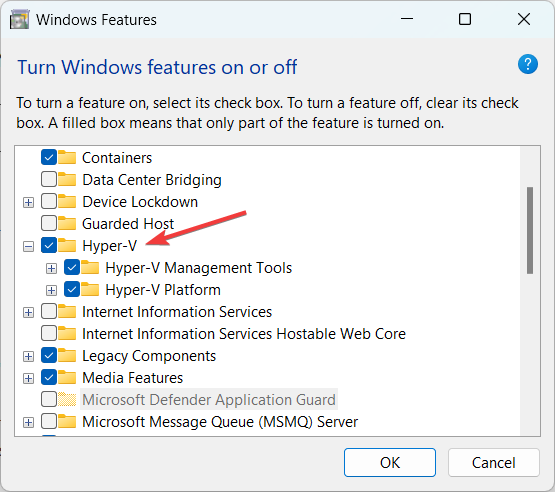
- Enable Hyper-V:
- Press the Start button, type Turn Windows features on or off and select the app from the results.
- In the list that appears, check the box next to Hyper-V and click OK.
- Reboot your computer if prompted.
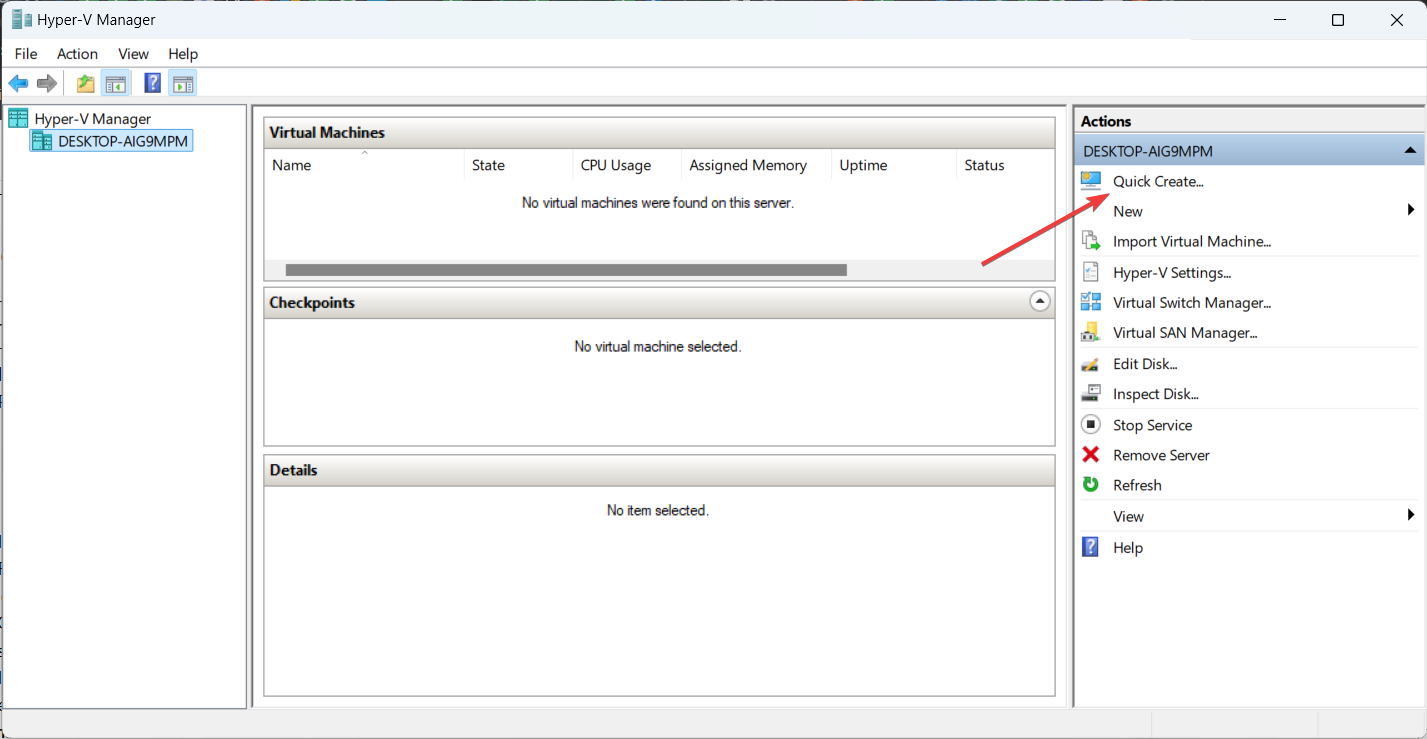
- Configure Hyper-V Manager:
- Open the Hyper-V Manager by pressing the Windows key, typing Hyper-V Manager, and selecting it from the search results.
- In the right panel, click on Quick Create to start setting up a new virtual machine. This step ensures you have the managerial console to create and manage your virtual machines.
- Download and Convert Linux Distros:
- Download the ARM64 version of the preferred Linux distro from their official website.
- Use qemu-img to convert the downloaded image to vhdx format:
qemu-img convert -f raw -O vhdx linux-distro.img linux-distro.vhdx - To run this command, you need to have WSL (Windows Subsystem for Linux) installed.
- Converting the image to vhdx ensures it is compatible with Hyper-V.
- Create and Setup VM in Hyper-V:
- In Hyper-V Manager, click on New > Virtual Machine…
- Follow the wizard and specify the name and location of the VM.
- Choose Generation 2 for the VM generation.
- Allocate the desired amount of memory (at least 2GB for a smooth experience).
- Attach the network adapter by selecting a virtual switch.
- Select the vhdx Linux image you converted earlier as the virtual hard disk.
- Complete the wizard and click Finish.
- Ensures your VM is correctly set up to run the ARM64 Linux distro.
- Start the VM:
- Right-click the newly created VM in Hyper-V Manager and select Connect…
- Click Start in the toolbar.
- By following these steps, you should see the Linux bootloader and proceed with the installation.
This solution will help you get Hyper-V running on your Snapdragon X Elite laptop, allowing you to use it for virtualizing ARM64 Linux distributions efficiently.
2. Troubleshooting Hyper-V boot issues
- First, ensure that your Snapdragon X Elite device supports all features required by Hyper-V. This can be verified in the BIOS/UEFI settings or the device specifications.
- Open Hyper-V Manager, right-click your VM and select Settings.
- Navigate to the Security tab, and disable Secure Boot. Disabling Secure Boot can solve issues related to Linux boot failures.
- Additional Configuration with qemu:
- If using ARM64 Linux distros, additional configurations might be needed.
- Modify VM settings for processor compatibility in Hyper-V Manager.
- Add virtual CPUs to match the number of physical CPUs. This ensures that the virtual machine settings are optimized for ARM64 architecture.
- Use Alternate Boot Manager:
- If your Linux distro hangs at the bootloader, consider using an alternate boot manager.
- Download and set up UEFI firmware for ARM64, such as AAVMF.
- Using an alternate boot manager can resolve compatibility issues with the EFI firmware.
By addressing common boot issues, this solution helps ensure that your ARM64 virtual machines run smoothly on Hyper-V.
3. Running Windows Subsystem for Linux (WSL) with Hyper-V
- Enable WSL and Virtual Machine Platform:
- Open PowerShell as Administrator by right-clicking the Start Menu and selecting Windows PowerShell (Admin).
- Type the following commands to enable WSL and the Virtual Machine Platform:
dism.exe /online /enable-feature /featurename:Microsoft-Windows-Subsystem-Linux /all /norestartdism.exe /online /enable-feature /featurename:VirtualMachinePlatform /all /norestart- Restart your computer. After these commands, WSL and virtualization support are enabled.
- Install a Linux Distro:
- Open Microsoft Store and search for your preferred Linux distribution (e.g., Ubuntu, Debian).
- Click Install and follow the on-screen instructions to set up the Linux environment.
- Provides a lightweight Linux environment without needing a full VM.
- Integrate with Visual Studio Code:
- Install Visual Studio Code from the official website.
- Open VS Code and install the Remote – WSL extension.
- Open WSL terminal by pressing Ctrl + (backtick) in VS Code.
- This will enable seamless development integration between Windows and Linux environments.
- Run Docker within WSL:
- Install Docker Desktop for Windows from Docker’s official website.
- Enable the WSL 2 based engine in Docker settings. This allows for containerized applications within the WSL environment.
Using WSL with Hyper-V offers a seamless integration of Linux tools and applications within Windows, catering to developers and users needing both environments.
By following these solutions, you can effectively run Linux on Snapdragon X Elite laptops using Hyper-V, overcoming any compatibility or performance issues.
Wondering how to change the resolution in Hyper-V? Click on the highlighted link to learn all about that.
You might also get more information on the Windows 11 requirements for VMWare and Hyper-V.
If you have trouble, don’t hesitate to leave a comments in the dedicated section below.